Element UI 实战教程
1.Element UI 引言 官网: https://element.eleme.io/#/zh-CN
1.1 官方定义 网站快速成型工具 和 桌面端组件库
1.2 定义 element ui 就是基于vue的一个ui框架,该框架基于vue开发了很多相关组件,方便我们快速开发页面。
1.3 由来 饿了么前端团队 基于vue进行开发并且进行了开源 element ui 中提供全部都是封装好组件。
2.安装Element UI 2.1通过vue脚手架创建项目 1 vue init webpack element (项目名)
2.2在vue脚手架项目中安装elementui 1 2 3 4 5 6 7 8 9 # 1. 下载elementui的依赖 npm i element-ui -S # 2. 指定当前项目中使用elementui import ElementUI from 'element-ui' ; import 'element-ui/lib/theme-chalk/index.css' ; Vue .use (ElementUI );
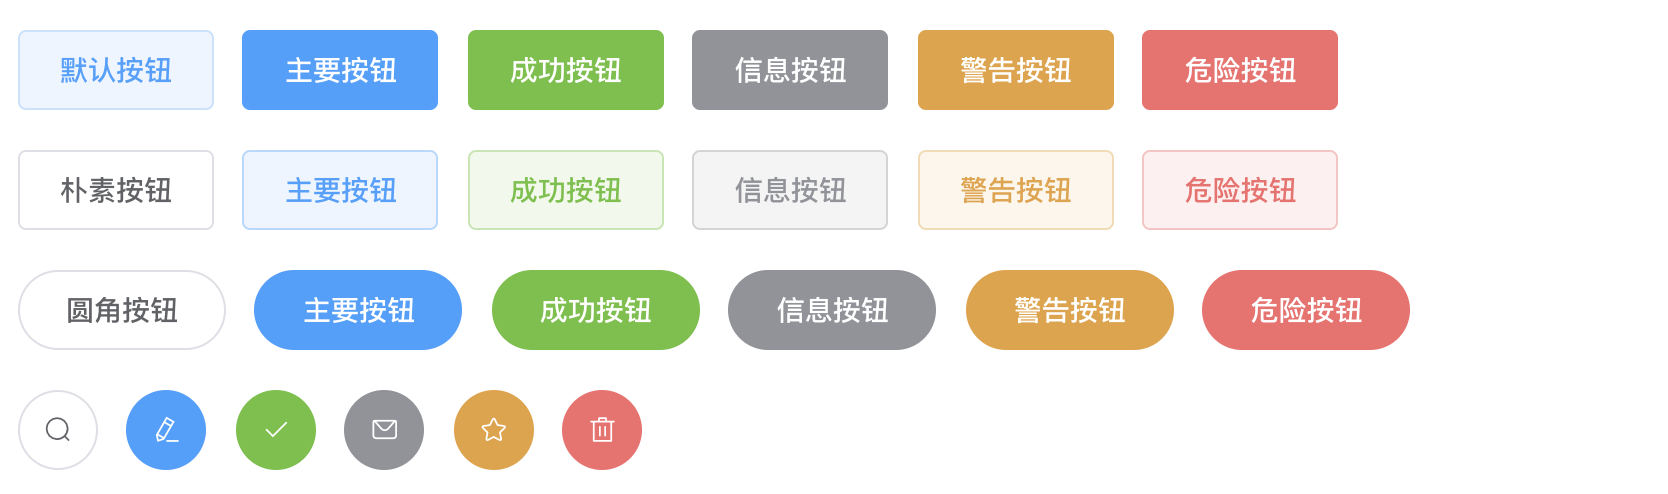
3.按钮组件(示例) 3.1 默认样式按钮 1 2 3 4 5 6 7 8 <el-row > <el-button > 默认按钮</el-button > <el-button type ="primary" > 主要按钮</el-button > <el-button type ="success" > 成功按钮</el-button > <el-button type ="info" > 信息按钮</el-button > <el-button type ="warning" > 警告按钮</el-button > <el-button type ="danger" > 危险按钮</el-button > </el-row >
3.2 简洁按钮 1 2 3 4 5 6 7 8 <el-row > <el-button plain > 朴素按钮</el-button > <el-button type ="primary" plain > 主要按钮</el-button > <el-button type ="success" plain > 成功按钮</el-button > <el-button type ="info" plain > 信息按钮</el-button > <el-button type ="warning" plain > 警告按钮</el-button > <el-button type ="danger" plain > 危险按钮</el-button > </el-row >
3.3 圆角按钮 1 2 3 4 5 6 7 8 <el-row > <el-button round > 圆角按钮</el-button > <el-button type ="primary" round > 主要按钮</el-button > <el-button type ="success" round > 成功按钮</el-button > <el-button type ="info" round > 信息按钮</el-button > <el-button type ="warning" round > 警告按钮</el-button > <el-button type ="danger" round > 危险按钮</el-button > </el-row >
3.4 图标按钮 1 2 3 4 5 6 7 8 <el-row > <el-button icon ="el-icon-search" circle > </el-button > <el-button type ="primary" icon ="el-icon-edit" circle > </el-button > <el-button type ="success" icon ="el-icon-check" circle > </el-button > <el-button type ="info" icon ="el-icon-message" circle > </el-button > <el-button type ="warning" icon ="el-icon-star-off" circle > </el-button > <el-button type ="danger" icon ="el-icon-delete" circle > </el-button > </el-row >
4.按钮组件的详细使用 总结:日后使用element ui的相关组件时需要注意的是 所有组件都是el-组件名称开头
4.1创建按钮 1 <el-button > 默认按钮</el-button >
4.2 按钮属性使用 1 2 <el-button type ="primary" 属性名 =属性值 > 默认按钮</el-button > <el-button type ="success" size ="medium" plain =true round circle icon ="el-icon-loading" > </el-button >
总结:在elementui中所有组件的属性全部写在组件标签上
4.3 按钮组使用 1 2 3 4 <el-button-group > <el-button type ="primary" icon ="el-icon-back" > 上一页</el-button > <el-button type ="primary" icon ="el-icon-right" > 下一页</el-button > </el-button-group >
注意:
在element ui中所有组件都是 el-组件名称 方式进行命名
在element ui中组件的属性使用都是直接将属性名=属性值方式写在对应的组件标签上
5.Link 文字链接组件 5.1 文字链接组件的创建 5.2 文字链接组件的属性的使用 1 2 3 4 5 6 <el-link target ="_blank" href ="http://www.baidu.com" > 默认链接</el-link > <el-link type ="primary" :underline ="false" > 默认链接</el-link > <el-link type ="success" disabled > 默认链接</el-link > <el-link type ="info" icon ="el-icon-platform-eleme" > 默认链接</el-link > <el-link type ="warning" > 默认链接</el-link > <el-link type ="danger" > 默认链接</el-link >
6.Layout (栅格)布局组件的使用 通过基础的 24 分栏,迅速简便地创建布局
在element ui中布局组件将页面划分为多个行row,每行最多分为24栏(列)
6.1 使用Layout组件 1 2 3 4 5 <el-row > <el-col :span ="8" > 占用8份</el-col > <el-col :span ="8" > 占用8份</el-col > <el-col :span ="8" > 占用8份</el-col > </el-row >
注意:
在一个布局组件中 是由 row 和 col 组合而成
在使用时要区分 row属性 和 col属性
6.2 属性的使用
行属性使用
1 2 3 4 5 6 <el-row :gutter ="50" tag ="span" > <el-col :span ="4" > <div style ="border: 1px red solid;" > 占用4份</div > </el-col > <el-col :span ="8" > <div style ="border: 1px red solid;" > 占用8份</div > </el-col > <el-col :span ="3" > <div style ="border: 1px red solid;" > 占用3份</div > </el-col > <el-col :span ="9" > <div style ="border: 1px red solid;" > 占用9份</div > </el-col > </el-row >
列属性的使用
1 2 3 4 <el-row > <el-col :span ="12" :offset ="9" :psuh ="3" xs > <div style ="border: 1px blue solid;" > 我是占用12分</div > </el-col > <el-col :span ="6" > <div style ="border: 1px blue solid;" > 我是占用6分</div > </el-col > </el-row >
7.Container 布局容器组件 7.1 创建布局容器 1 2 3 <el-container > </el-container >
7.2 容器中包含的子元素 1 2 3 4 <el-header > :顶栏容器。<el-aside > :侧边栏容器。<el-main > :主要区域容器。<el-footer > :底栏容器。
7.3 容器的嵌套使用 1 2 3 4 5 6 7 8 9 10 11 12 13 <el-container > <el-header > <div > <h1 > 我是标题</h1 > </div > </el-header > <el-container > <el-aside > <div > <h1 > 我是菜单</h1 > </div > </el-aside > <el-main > <div > <h1 > 我是中心内容</h1 > </div > </el-main > </el-container > <el-footer > <div > <h1 > 我是页脚</h1 > </div > </el-footer > </el-container >
7.4 水平容器 1 2 3 4 5 6 7 8 9 10 11 <el-container direction ="horizontal" > <el-header > <div > <h1 > 我是标题</h1 > </div > </el-header > <el-container > <el-aside > <div > <h1 > 我是菜单</h1 > </div > </el-aside > <el-main > <div > <h1 > 我是中心内容</h1 > </div > </el-main > </el-container > <el-footer > <div > <h1 > 我是页脚</h1 > </div > </el-footer > </el-container >
注意:当子元素中没有有 el-header 或 el-footer 时容器排列为水平
7.5 垂直容器 1 2 3 4 5 6 7 8 9 10 11 12 <el-container direction ="vertical" > <el-header > <div > <h1 > 我是标题</h1 > </div > </el-header > <el-container > <el-aside > <div > <h1 > 我是菜单</h1 > </div > </el-aside > <el-main > <div > <h1 > 我是中心内容</h1 > </div > </el-main > </el-container > <el-footer > <div > <h1 > 我是页脚</h1 > </div > </el-footer > </el-container >
8.1 Radio单选按钮 1.创建Radio按钮 1 2 3 4 5 6 7 8 9 10 11 12 13 <el-radio v-model ="label" label ="男" > 男</el-radio > <el-radio v-model ="label" label ="女" > 女</el-radio > <script > export default { name : "Radio" , data ( return { label :'男' } } } </script >
注意:在使用radio单选按钮是至少加入v-model和label两个属性
2.Radio按钮属性的使用 1 2 3 4 <el-radio v-model ="label" name ="sex" disabled label ="男" > 男</el-radio > <el-radio v-model ="label" name ="sex" border size ="small" label ="女" > 女</el-radio > <el-radio v-model ="label" border size ="mini" label ="女" > 女</el-radio > <el-radio v-model ="label" border size ="medium" label ="女" > 女</el-radio >
总结:属性使用还是直接卸载对应的组件标签上以 属性名=属性值 方式使用
3.Radio事件的使用 1 2 3 4 5 6 7 8 9 10 11 12 13 14 15 16 17 18 19 20 <el-radio v-model ="label" @change ="aa" name ="sex" label ="男" > 男</el-radio > <el-radio v-model ="label" @change ="aa" name ="sex" border size ="small" label ="女" > 女</el-radio > <script > export default { name : "Radio" , data ( return { label :'男' } }, methods :{ aa ( console .log (this .label ); } } } </script >
总结:
事件的使用也是和属性使用是一致都是直接写在对应的组件标签上
事件在使用时必须使用Vue中绑定时间方式进行使用如 @事件名=事件处理函数(绑在在vue组件中对应函数)
4.radio按钮组 1 2 3 4 5 6 7 8 9 10 11 12 13 14 15 <el-radio-group v-model ="radio" > <el-radio :label ="3" > 备选项3</el-radio > <el-radio :label ="6" > 备选项6</el-radio > <el-radio :label ="9" > 备选项9</el-radio > </el-radio-group > <script > export default { name : "Radio" , data ( return { radio : 6 } } } </script >
8.2 checkbox组件 1.创建checkbox组件 1 2 3 <el-checkbox v-model ="checked" > 北京</el-checkbox > <el-checkbox v-model ="checked" > 上海</el-checkbox > <el-checkbox v-model ="checked" > 天津</el-checkbox >
2.属性使用 1 2 3 <el-checkbox v-model ="checked" disabled true-label ="北京" > 北京</el-checkbox > <el-checkbox checked border true-label ="上海" > 上海</el-checkbox > <el-checkbox v-model ="checked" true-label ="天津" > 天津</el-checkbox >
3.事件使用 1 2 3 4 5 6 7 8 9 10 11 12 13 14 15 16 17 <el-checkbox @change ="aa" v-model ="checked" true-label ="上海" > 上海</el-checkbox > <el-checkbox v-model ="checked" @change ="aa" true-label ="天津" > 天津</el-checkbox > <script > export default { name : "Checkbox" , data ( return { checked :true } }, methods :{ aa ( console .log (this .checked ); } } } </script >
4.复选框组的使用 1 2 3 4 5 6 7 8 9 10 11 12 13 14 15 16 17 18 19 20 21 22 23 24 25 26 <el-checkbox-group @change ="bb" :min ="1" v-model ="checkList" > <el-checkbox label ="复选框 A" > </el-checkbox > <el-checkbox label ="复选框 B" > </el-checkbox > <el-checkbox label ="复选框 C" > </el-checkbox > <el-checkbox label ="禁用" disabled > </el-checkbox > <el-checkbox label ="选中且禁用" disabled > </el-checkbox > </el-checkbox-group > <script > export default { name : "Checkbox" , data ( return { checked :true , checkList :[], } }, methods :{ aa ( console .log (this .checked ); }, bb ( console .log (this .checkList ); } } } </script >
1 2 3 4 5 6 7 8 9 10 11 <el-input v-model ="name" > </el-input > <script > export default { name : "Input" , data ( return { name :'xiaochen' } } } </script >
2.常用属性 1 2 3 4 5 6 7 8 9 10 11 12 13 14 15 16 17 18 19 20 <el-input v-model ="name" disabled type ="textarea" > </el-input > <el-input v-model ="price" :maxlength ="10" show-word-limit :minlength ="5" > </el-input > <el-input prefix-icon ="el-icon-user-solid" placeholder ="请输入用户名" clearable v-model ="username" > </el-input > <el-input suffix-icon ="el-icon-star-off" placeholder ="请输入密码" show-password type ="password" clearable v-model ="password" > </el-input > <script > export default { name : "Input" , data ( return { restaurants : [], state1 : '' , state2 : '' , name :'xiaochen' , price :0.0 , username :"" , password :"" , }; }, } </script >
3.事件使用 1 2 3 4 5 6 7 8 9 10 11 12 13 14 15 16 17 18 19 20 21 22 23 24 25 26 27 28 29 30 31 32 33 34 <el-input v-model ="username" @blur ="aaa" @focus ="bbb" @clear ="clears" clearable @input ="ccc" > </el-input > <script > export default { name : "Input" , data ( return { restaurants : [], state1 : '' , state2 : '' , name :'xiaochen' , price :0.0 , username :"" , password :"" , }; }, methods :{ aaa ( console .log ('失去焦点' ); ; }, bbb ( console .log ("获取焦点" ); }, ccc (value ){ console .log ("改变:" +value); }, clears ( console .log ("清楚" ); } } } </script >
4.方法的使用 1 2 3 4 5 6 7 8 9 10 11 12 13 14 15 16 17 18 19 20 21 22 23 24 <h1 > 方法的使用</h1 > <el-input v-model ="username" ref ="inputs" > </el-input > <el-button @click ="focusInputs" > focus方法</el-button > <el-button @click ="blurInputs" > blur方法</el-button > <script > export default { name : "Input" , data ( return {} }, methods :{ focusInputs ( this .$refs .inputs .focus (); }, blurInputs ( this .$refs .inputs .blur (); } } } </script >
总结
在使用组件的方法时需要在对应的组件中加入 ref="组件别名"
在调用方法时直接使用 this.$refs.组件别名.方法名()
注意:在elementui中所有组件 都存在 属性 事件 和方法
属性:直接写在对应的组件标签上 使用方式:属性名=属性值方式
事件: 直接使用vue绑定事件方式写在对应的组件标签上 使用方式:@事件名=vue中事件处理函数
方法: 1.在对应组件标签上使用ref=组件别名 2.通过使用this.$refs.组件别名.方法名()进行调用
8.4 Select选择器组件的使用 1.组件创建 1 2 3 4 5 6 7 8 9 10 11 12 13 14 15 16 17 18 19 20 21 22 23 24 25 26 27 28 29 30 31 32 33 34 35 36 37 38 39 40 41 42 43 44 45 46 47 # 1.数据写死在页面上 <el-select v-model ="cityName" > <el-option value ="北京" > </el-option > <el-option value ="天津" > </el-option > </el-select > 注意:1.要求下拉列表中必须存在option的value属性值 2.要求select中必须使用v-model进行数据绑定 # 2.如何动态获取数据 <el-select > <el-option v-for ="option in options" :label ="option.name" :value ="option.id" :key ="option.id" > </el-option > </el-select > <script > export default { name: "Select", data(){ return{ options:[ {id:'1',name:"研发部"}, {id:'2',name:"小卖部"}, {id:'3',name:"小米部"}, ] } }, } </script> # 3.获取下拉列表选中数据 <el-select v-model="cityId" multiple clearable> <el-option v-for="option in options" :label="option.name" :value="option.id" :key="option.id"></el-option> </el-select> <script> export default { name: "Select", data(){ return{ options:[ {id:'1',name:"研发部"}, {id:'2',name:"小卖部"}, {id:'3',name:"小米部"}, ], cityId:'' } }, } </script>
2.属性使用 1 2 3 <el-select v-model ="cityId" multiple clearable > ...... </el-select >
3.事件的使用 1 2 3 4 5 6 7 8 9 10 11 12 13 14 15 16 17 18 19 20 21 22 23 24 25 <el-select v-model ="cityId" @change ="aaa" multiple clearable > <el-option v-for ="option in options" :label ="option.name" :value ="option.id" :key ="option.id" > </el-option > </el-select > <script > export default { name : "Select" , data ( return { options :[ {id :'1' ,name :"研发部" }, {id :'2' ,name :"小卖部" }, {id :'3' ,name :"小米部" }, ], cityId :'' , cityName :'' } }, methods :{ aaa (value ){ console .log (value); } } } </script >
4.方法的使用 1 2 3 4 5 6 1.给组件通过ref起别名并绑定到vue实例中 <el-select ref ="selects" v-model ="cityId" @change ="aaa" multiple clearable > .... </el-select > 2.调用方法 this.$refs.selects.focus();//方法调用
8.5 Switch 开关组件 1.Switch组件的创建 1 2 3 4 5 6 7 8 9 10 11 <el-switch v-model ="value" > </el-switch > <script > export default { name : "Switchs" , data ( return { value :true } } } </script >
2.属性使用 1 2 3 <el-switch v-model ="value" active-text ="打开" active-color ="#13ce66" inactive-color ="#ff4949" :active- value ="true" :inactive-value ="false" inactive-text ="关闭" :width ="200" > </el-switch >
3.事件使用 1 2 3 4 5 6 7 8 9 10 11 12 13 14 15 16 <el-switch v-model ="value" @change ="aaa" > </el-switch > <script > export default { name : "Switchs" , data ( return { value :true } }, methods :{ aaa (value ){ console .log (value); } } } </script >
4.方法使用 1 2 3 4 5 6 7 8 9 10 11 12 13 14 15 16 17 18 19 20 21 22 23 <el-switch ref ="sw" v-model ="value" @change ="aaa" active-text ="打开" active-color ="#13ce66" inactive-color ="#ff4949" :active-value ="true" :inactive-value ="false" inactive-text ="关闭" :width ="200" > </el-switch > <el-button @click ="bbb" > 调用方法</el-button > <script > export default { name : "Switchs" , data ( return { value :true } } , methods :{ aaa (value ){ console .log (value); }, bbb ( alert (); this .$refs .sw .focus (); } } } </script >
8.6 DatePicker组件 1.创建 1 <el-date-picker v-model ="createDate" > </el-date-picker >
2.属性的使用 1 2 3 4 5 6 7 8 9 10 11 <el-date-picker v-model ="createDate" :editable ="false" :clearable ="false" placeholder ="请输入创建时间" type ="daterange" start-placeholder ="生产时间" end-placeholder ="过期时间" format ="yyyy/MM/dd" > </el-date-picker >
3.Picker Options 和 Shortcuts使用
Shortcuts: 用来增加日期组件的快捷面板Picker Options: 用来对日期控件做自定义配置
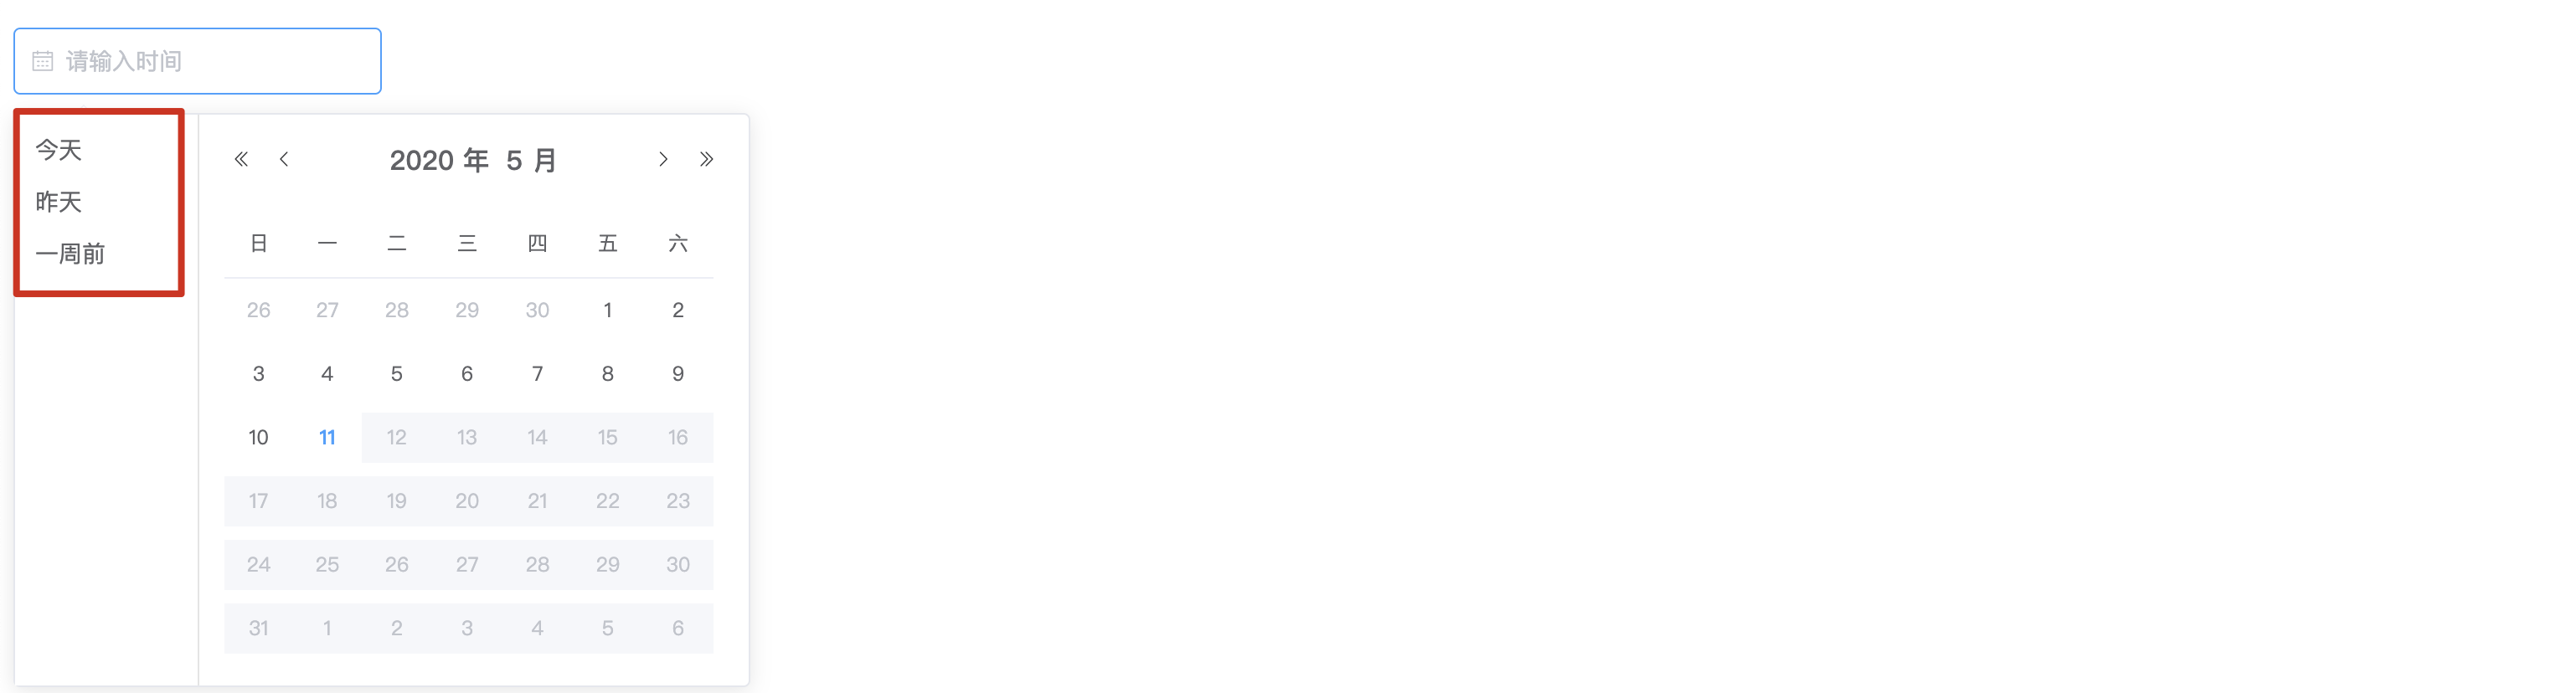
3.1 Shortcuts使用 1 2 3 4 5 6 7 8 9 10 11 12 13 14 15 16 17 18 19 20 21 22 23 24 25 26 27 28 29 30 31 32 33 34 35 36 37 38 39 40 41 42 43 44 </el-date-picker > <h1 > 日期配置</h1 > <el-date-picker v-model ="createDate" type ="date" placeholder ="请输入时间" :picker-options ="pickerOptions" > </el-date-picker > <script > export default { name : "DatePrickers" , data ( return { createDate :"" , pickerOptions : { disabledDate (time ) { return time.getTime () > Date .now (); }, shortcuts : [{ text : '今天' , onClick (picker ) { picker.$emit('pick' , new Date ()); } }, { text : '昨天' , onClick (picker ) { const date = new Date (); date.setTime (date.getTime () - 3600 * 1000 * 24 ); picker.$emit('pick' , date); } }, { text : '一周前' , onClick (picker ) { const date = new Date (); date.setTime (date.getTime () - 3600 * 1000 * 24 * 7 ); picker.$emit('pick' , date); } }] }, } } } </script >
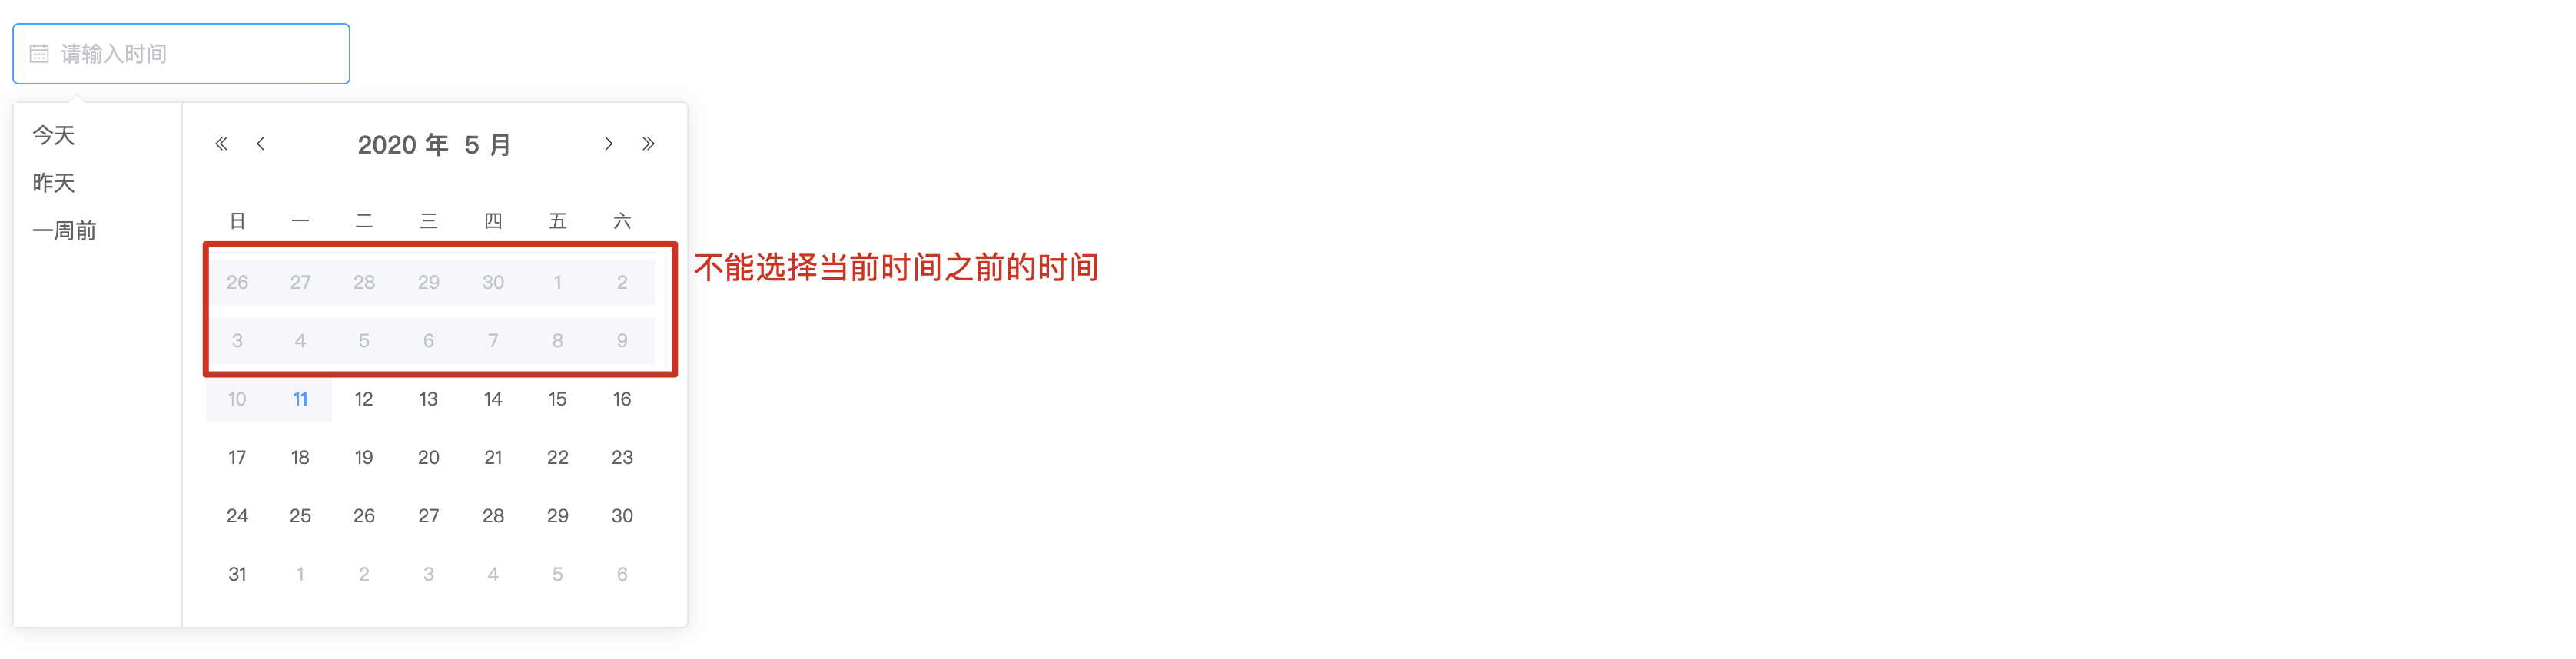
3.2 Picker Options 1 2 3 4 5 6 7 8 9 10 11 12 13 14 15 16 17 18 19 20 21 22 23 <el-date-picker v-model ="createDate" type ="date" placeholder ="请输入时间" :picker-options ="pickerOptions" > </el-date-picker > <script > export default { name : "DatePrickers" , data ( return { createDate :"" , pickerOptions : { disabledDate (time ) { return time.getTime () < Date .now (); } }, } } } </script >
4.事件使用 1 2 3 4 5 6 7 8 9 10 11 12 13 14 15 16 17 18 19 20 21 22 <el-date-picker ..... :picker-options ="pickerOptions" @change ="aaa" > </el-date-picker > <script > export default { name : "DatePrickers" , data ( return { createDate :"" , } }, methods :{ aaa (value ){ console .log (value); } } } </script >
8.7 Upload组件 1.组件创建 1 2 3 4 <el-upload action ="https://jsonplaceholder.typicode.com/posts/" :file-list ="fileList" > <el-button size ="small" type ="primary" > 点击上传</el-button > <div slot ="tip" class ="el-upload__tip" > 只能上传jpg/png文件,且不超过500kb</div > </el-upload >
注意:在使用upload组件时必须设置action属性 action属性为必要参数不能省略
2.属性和事件的使用 1 2 3 4 5 6 7 8 9 10 11 12 13 14 15 16 17 18 19 20 21 22 23 24 25 26 27 28 29 30 31 32 33 34 35 36 37 38 39 40 41 42 43 <el-upload :limit ="3" :on-exceed ="exceed" :multiple ="false" :before-remove ="beforeRemove" :on-remove ="remove" :on-preview ="show" :drag ="true" accept =".txt,.png" :show-file-list ="true" name ="aaa" :data ="info" action ="https://jsonplaceholder.typicode.com/posts/" :file-list ="fileList" > <i class ="el-icon-upload" > </i > <div class ="el-upload__text" > 将文件拖到此处,或<em > 点击上传</em > </div > <div class ="el-upload__tip" slot ="tip" > 只能上传jpg/png文件,且不超过500kb</div > </el-upload > <script > export default { name : "Uploads" , data ( return { fileList : [{ name : 'food.jpeg' , url : 'https://fuss10.elemecdn.com/3/63/4e7f3a15429bfda99bce42a18cdd1jpeg.jpeg?imageMogr2/thumbnail/360x360/format/webp/quality/100' }, { name : 'food2.jpeg' , url : 'https://fuss10.elemecdn.com/3/63/4e7f3a15429bfda99bce42a18cdd1jpeg.jpeg?imageMogr2/thumbnail/360x360/format/webp/quality/100' }], info : {id :"21" } } }, methods :{ show (file ){ console .log (file); }, remove (file,fileList ){ console .log (file); console .log (fileList); }, beforeRemove (file,fileList ){ if (fileList.length <3 ){ alert ("上传文件不能少于3个" ) return false ; } }, exceed (file,fileList ){ alert ("文件超出上传的个数限制" ) } } } </script >
注意:在使用upload组件时没有event事件,所有事件都是属性事件
3.方法的使用 1 2 3 4 5 6 <el-upload ref ="uploads" .... > ........</el-upload > 方法调用: this.$refs.uploads.clearFiles(); this.$refs.uploads.abort(); this.$refs.uploads.submit();
1.组件的创建 1 2 3 4 5 6 7 8 9 10 11 12 13 14 15 16 17 18 19 20 21 22 23 24 25 26 27 28 29 30 31 32 33 34 <el-form ref ="form" :model ="form" label-width ="80px" > <el-form-item label ="活动名称" > <el-input v-model ="form.name" > </el-input > </el-form-item > ...... <el-form-item > <el-button type ="primary" @click ="onSubmit" > 立即创建</el-button > <el-button > 取消</el-button > </el-form-item > </el-form > <script > export default { name : "Form" , data ( return { form : { name : '' , region : '' , date1 : '' , date2 : '' , delivery : false , type : [], resource : '' , desc : '' } } }, methods : { onSubmit ( console .log ('submit!' ); } } } </script >
2.内联表单 1 2 3 <el-form :inline ="true" :model ="formInline" class ="demo-form-inline" > ....... </el-form >
通过设置 inline=true方式将表单作为内联表单处理
3.表单验证
Form 组件提供了表单验证的功能,只需要通过 rules 属性传入约定的验证规则,并将 Form-Item 的 prop 属性设置为需校验的字段名即可。校验规则参见 async-validator
3.1 失去焦点自动验证 1 2 3 4 5 6 7 8 9 10 11 12 13 14 15 16 17 18 19 20 21 22 23 24 25 26 27 28 29 30 31 32 33 34 35 36 <el-form :rules ="rules" ... > <el-form-item label ="活动名称" prop ="name" > <el-input v-model ="form.name" > </el-input > </el-form-item > .... </el-form > <script > export default { name : "Form" , data ( return { form : { name : '' , region : '' , date1 : '' , date2 : '' , delivery : false , type : [], resource : '' , desc : '' }, rules : { name : [ {required : true , message : '请输入活动名称' , trigger : 'blur' }, {min : 3 , max : 5 , message : '长度在 3 到 5 个字符' , trigger : 'blur' } ], } } }, methods : { onSubmit ( console .log ('submit!' ); } } } </script >
3.2 表单提交调用表单组件的验证方法验证 1 2 3 4 5 6 7 8 9 10 11 12 13 14 15 16 17 18 19 20 21 22 23 <el-form :rules ="rules" .... ref ="form" > <el-form-item label ="活动名称" prop ="name" > <el-input v-model ="form.name" > </el-input > </el-form-item > <el-form-item > <el-button type ="primary" @click ="onSubmit('form')" > 立即创建</el-button > <el-button > 取消</el-button > </el-form-item > </el-form > ... methods: { onSubmit(formName) { this.$refs[formName].validate((valid) => { if (valid) { alert('submit!'); //发送异步请求 到 springboot项目 } else { console.log('error submit!!'); return false; } }); } }
4.自定义表单的验证规则 1 2 3 4 5 6 7 8 9 10 11 12 13 14 15 16 17 18 19 20 21 22 23 24 25 26 27 28 29 30 31 32 33 34 35 36 37 38 39 40 41 42 43 44 45 46 47 48 49 50 51 52 53 54 55 <el-form :model ="ruleForm" :rules ="rules" ref ="ruleForm" label-width ="100px" > <el-form-item label ="手机号" prop ="phone" > <el-input type ="password" v-model ="ruleForm.phone" > </el-input > </el-form-item > <el-form-item > <el-button type ="primary" @click ="submitForm('ruleForm')" > 提交</el-button > <el-button @click ="resetForm('ruleForm')" > 重置</el-button > </el-form-item > </el-form > <script > export default { name : "Form" , data ( let validatePhone = (rule,value,callback )=>{ console .log (rule); console .log (value); console .log (callback); if (!value){ callback (new Error ("手机号不能为空!" )); } if (!/^1[3456789]\d{9}$/ .test (value)){ callback (new Error ("手机号码不正确!!" )) } } return { form : { name : '' , region : '' , date1 : '' , date2 : '' , delivery : false , type : [], resource : '' , desc : '' }, rules : { name : [ {required : true , message : '请输入活动名称' , trigger : 'blur' }, {min : 3 , max : 5 , message : '长度在 3 到 5 个字符' , trigger : 'blur' } ], phone :[ {validator :validatePhone,trigger : 'blur' } ] }, ruleForm :{ phone :'' , }, } }, methods : { } } </script >
9.消息提示 9.1警告提示 1.1 创建警告提示 1 2 3 4 5 6 <el-alert title ="成功信息提示" :closable ="false" type ="success" > <div slot > 我是辅助信息</div > </el-alert > <el-alert title ="成功信息提示" type ="info" > </el-alert > <el-alert title ="成功信息提示" type ="warning" > </el-alert > <el-alert title ="成功信息提示" type ="error" > </el-alert >
1.2属性的使用 1 2 3 <el-alert title ="成功信息提示" effect ="dark" :show-icon ="true" center :closable ="false" type ="success" > <div slot > 我是辅助信息</div > </el-alert >
9.2 Message消息提示 2.1 创建组件
注意:这个组件的创建无须在页面中书写任何标签,他是一个js插件,在需要展示消息提示的位置直接调用提供的js插件方法即可
1 2 3 4 5 6 7 8 9 10 11 12 13 14 15 16 17 18 19 20 21 22 23 24 25 26 27 28 29 30 # 1. 创建最简单的消息 this .$message('这是一个消息提示!!' ) # 2. 自定义消息内容 this .$message({ message : h ('p' , null , [ h ('span' , null , '订单创建成功,您的订单编号为: ' ), h ('i' , { style : 'color: teal' }, '87' ) ]) }); # 3. 不同主题的消息提示 this .$message({ message :'这是信息提示' , type :"success" , }) # 4. 属性使用 this .$message({ message :'这是信息提示' , type :"success" , showClose :true , center :true , iconClass :'el-icon-user-solid' , duration :0 }) # 5. 方法的使用 this .$message .closeAll ();
10.table表格组件 1.组件的创建 1 2 3 4 5 6 7 8 9 10 11 12 13 14 15 16 17 18 19 <el-table :data ="tableData" > <el-table-column prop ="id" label ="编号" > </el-table-column > <el-table-column prop ="name" label ="姓名" > </el-table-column > <el-table-column prop ="age" label ="年龄" > </el-table-column > <el-table-column prop ="email" label ="邮箱" > </el-table-column > </el-table > <script > export default { name : "Tables" , data ( return { tableData :[ {id :21 ,name :"小陈" ,age :23 ,email :"60037647@qq.com" }, {id :22 ,name :"小张" ,age :25 ,email :"60038647@qq.com" }, ] } } } </script >
2.表格中列属性
1 2 3 4 5 6 7 8 9 10 11 12 13 14 15 16 17 18 19 20 21 22 23 24 25 26 27 28 29 30 31 32 33 34 35 36 37 38 39 40 41 42 43 <el-table-column prop ="id" :resizable ="false" header-align ="left" align ="center" fixed ="left" width ="200px;" label ="编号" > </el-table-column > <el-table-column prop ="name" label ="姓名" > </el-table-column > <el-table-column prop ="age" :sort-method ="sorts" sortable label ="年龄" > </el-table-column > <el-table-column prop ="email" label ="邮箱" > </el-table-column > <el-table-column prop ="dept.name" :formatter ="showDept" label ="部门" > </el-table-column > <script > export default { name : "Tables" , data ( return { tableData : [ { id : 21 , name : "小陈" , age : 23 , email : "60037647@qq.com" , dept : {id : 1 , name : "研发部" } }, { id : 22 , name : "小张" , age : 25 , email : "60038647@qq.com" , dept : {id : 1 , name : "小卖部" } }, { id : 23 , name : "小李" , age : 25 , email : "60038657@qq.com" , dept :{} }, ] } }, methods : { sorts (a, b ) { return a.age - b.age ; }, showDept (row, column, cellValue, index ){ console .log (row); console .log (column); console .log (cellValue); console .log (index); if (cellValue){ return cellValue } return "暂无部门" ; } } } </script >
3.表格属性 1 2 3 4 5 6 7 8 9 10 11 12 13 14 15 <el-table :data ="tableData" empty-text ="暂无数据" :row-class-name ="showCss" highlight-current-row :show-header ="true" :fit ="true" size ="mini" :height ="600" border > </el-table > <script > ..... methods : { showCss ({row, rowIndex} ) { if (rowIndex % 2 == 0 ) { return "warning-row" ; } return "success-row" ; } } </script >
4.组件事件使用 1 2 3 4 5 6 7 8 9 10 11 12 13 14 15 16 17 <el-table @事件名 ="事件处理函数名" > <el-table > <script > export default { name : "Tables" , data ( }, methods : { selectRow (selection, row ){ console .log (selection); console .log (row); } } } </script >
5.组件方法的使用 1 2 3 <el-table ref ="mytable" > ........</el-table > //调用方法 this.$refs.mytable.方法名
6.表格中定义操作列 1 2 3 4 5 6 7 8 9 10 11 12 13 14 15 16 17 18 19 20 21 22 23 24 25 26 27 28 29 30 31 32 33 <el-table > .... <el-table-column label ="操作" > <template slot-scope ="scope" > <el-button size ="mini" @click ="handleEdit(scope.$index, scope.row)" > 编辑</el-button > <el-button size ="mini" type ="danger" @click ="handleDelete(scope.$index, scope.row)" > 删除</el-button > </template > </el-table-column > </el-table > <script > export default { name : "Tables" , data ( ..... }, methods : { handleEdit (index,row ){ console .log (index); console .log (row); }, handleDelete (index,row ){ console .log (index); console .log (row); } } } </script >
7.自定义表头 1 2 3 4 5 6 7 8 9 10 11 12 13 14 15 16 17 18 19 20 21 22 23 24 25 26 27 28 29 30 31 32 33 34 35 36 37 38 39 40 41 42 43 44 45 46 47 48 49 50 51 52 53 54 55 56 57 58 59 60 61 62 63 64 65 66 67 68 69 70 71 72 73 74 75 76 77 78 79 80 81 82 <el-table :data ="tableData.filter(data => !search || data.name.toLowerCase().includes(search.toLowerCase()))" > ..... <el-table-column > <template slot ="header" slot-scope ="scope" > <el-input v-model ="search" size ="mini" placeholder ="输入关键字搜索" /> </template > <template slot-scope ="scope" > <el-button size ="mini" @click ="handleEdit(scope.$index, scope.row)" > 编辑</el-button > <el-button size ="mini" type ="danger" @click ="handleDelete(scope.$index, scope.row)" > 删除</el-button > </template > </el-table-column > </el-table > <script > export default { name : "Tables" , data ( return { tableData : [ { id : 21 , name : "小陈" , age : 23 , email : "60037647@qq.com" , dept : {id : 1 , name : "研发部" } }, { id : 22 , name : "小张" , age : 25 , email : "60038647@qq.com" , dept : {id : 1 , name : "小卖部" } }, { id : 23 , name : "小李" , age : 25 , email : "60038657@qq.com" , dept : {} }, { id : 24 , name : "小四" , age : 25 , email : "60038657@qq.com" , dept : {} }, ], search : '' } }, methods : { sorts (a, b ) { return a.age - b.age ; }, showDept (row, column, cellValue, index ) { if (cellValue) { return cellValue } return "暂无部门" ; }, showCss ({row, rowIndex} ) { if (rowIndex % 2 == 0 ) { return "warning-row" ; } return "success-row" ; }, selectRow (selection, row ){ console .log (selection); console .log (row); }, clearSelect ( this .$refs .mytable .clearSelection (); }, handleEdit (index,row ){ console .log (index); console .log (row); }, handleDelete (index,row ){ console .log (index); console .log (row); } } } </script >


 微信
微信 支付宝
支付宝