
使用conda创建虚拟环境,安装Pytorch
事先声明:并不需要一定Anaconda,Mac用户比较推荐Miniconda,这里只是介绍一款关于conda的软件,conda的操作都是一样的。截止本文章发布,Anaconda和Miniconda都适配M1 Mac,所以都可以安装。
一、使用Anaconda创建虚拟环境
1、创建环境
可以引入需要依赖的包,以下仅作演示
- numpy: python数值计算包
- matplotlib: 支持python画图
- pandas : 数据软件包
- jupyter notebook: 集成开发环境,可直接本地起服务调试python代码
1 | conda create -n 环境名 python=3.x numpy matplotlib pandas jupyter notebook |
1 | pip install torch==1.13.1+cu117 torchvision==0.14.1+cu117 torchaudio==0.13.1 --extra-index-url https://download.pytorch.org/whl/cu117 |
2、进入虚拟环境
1 | conda activate 环境名 |
可以看到命令行开头变了

3、退出虚拟环境
1 | conda deactivate |

4、删除虚拟环境
1 | conda remove -name 虚拟环境名称 --all |
5、删除环境中的某个包
1 | conda remove --name 虚拟环境名称 包名称 |
二、安装、配置Pytorch
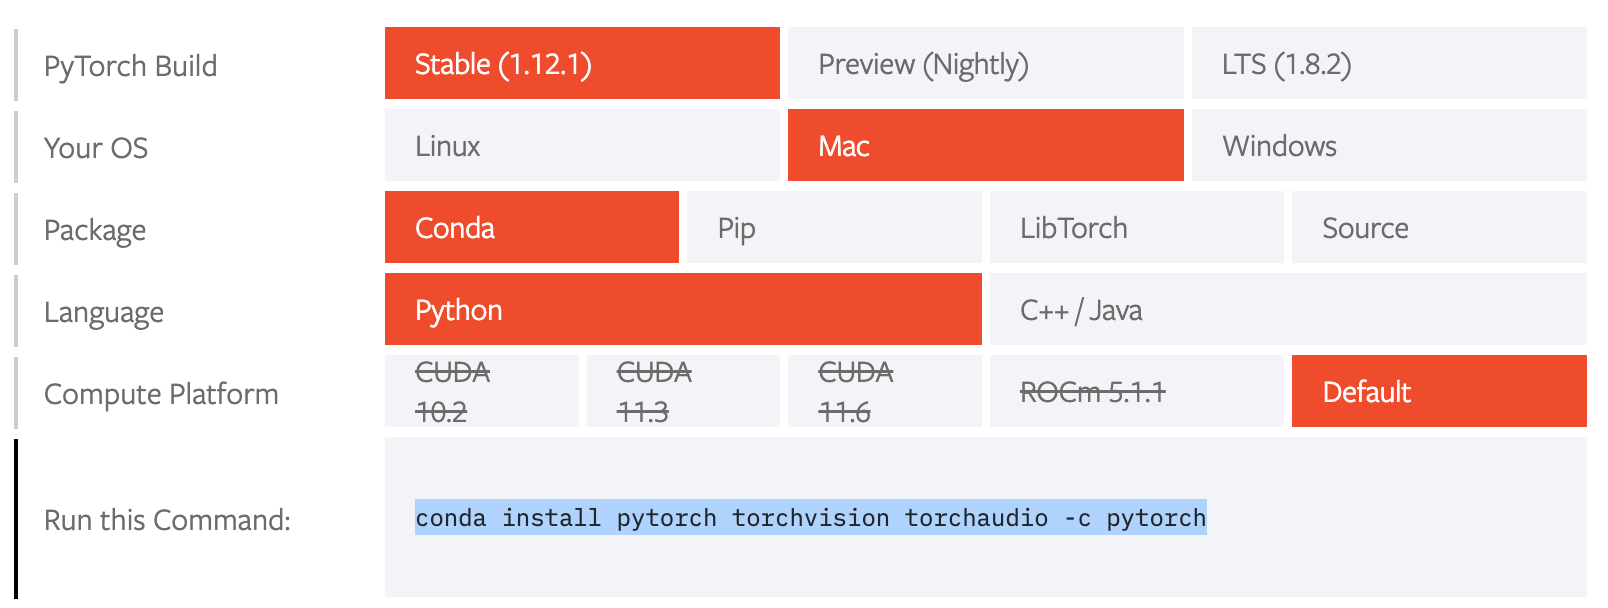
1、下载Pytorch,按照电脑配置安装适合的版本
比如我是Mac,就运行下面这句话
2*、如果安装慢,可以添加清华源和第三方源
#添加镜像源
conda config --add channels https://mirrors.tuna.tsinghua.edu.cn/anaconda/pkgs/main
conda config --add channels https://mirrors.tuna.tsinghua.edu.cn/anaconda/pkgs/free
conda config --add channels https://mirrors.tuna.tsinghua.edu.cn/anaconda/pkgs/r
conda config --add channels https://mirrors.tuna.tsinghua.edu.cn/anaconda/pkgs/pro
conda config --add channels https://mirrors.tuna.tsinghua.edu.cn/anaconda/pkgs/msys2
conda config --add channels https://mirrors.tuna.tsinghua.edu.cn/anaconda/cloud/conda-forge/
conda config --add channels https://mirrors.tuna.tsinghua.edu.cn/anaconda/cloud/msys2/
conda config --add channels https://mirrors.tuna.tsinghua.edu.cn/anaconda/cloud/bioconda/
conda config --add channels https://mirrors.tuna.tsinghua.edu.cn/anaconda/cloud/menpo/
conda config --add channels https://mirrors.tuna.tsinghua.edu.cn/anaconda/cloud/pytorch/

#显示检索路径
conda config --set show_channel_urls yes

#显示镜像通道
conda config --show channels
删除之前的镜像源,恢复默认状态
1 | conda config --remove-key channels |
去掉-c pytorch,默认从清华源下载安装包
1 | conda install pytorch torchvision |
3、验证Pytorch是否安装成功
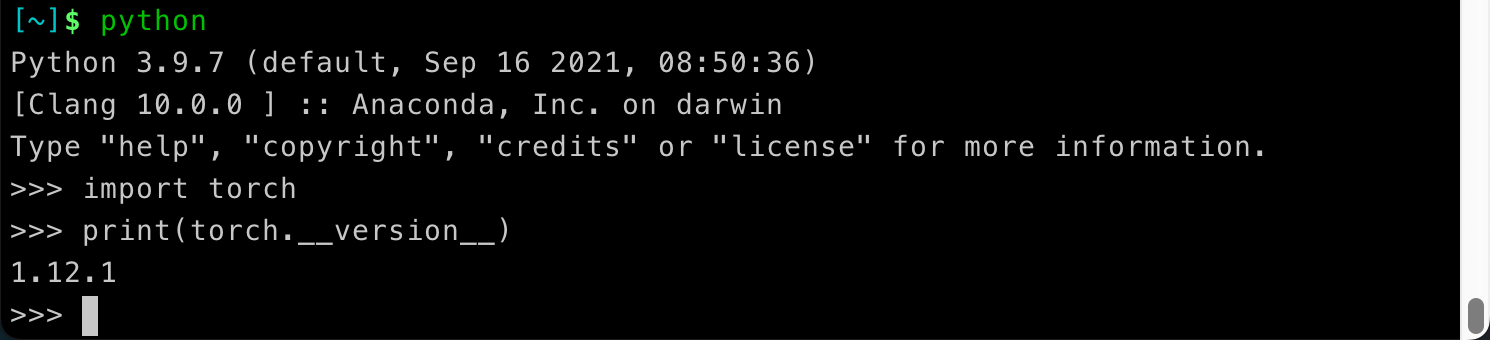
如果能输出torch版本就算成功了!
4、pip和conda导出requirement.txt
pip批量导出包含环境中所有组件的requirements.txt文件
1 | pip freeze > requirements.txt |
conda批量导出包含环境中所有组件的requirements.txt文件
1 | conda list -e > requirements.txt |
5、pip和conda从requirement.txt安装
pip批量安装requirements.txt文件中包含的组件依赖
1 | pip install -r requirements.txt |
conda批量安装requirements.txt文件中包含的组件依赖
1 | conda install --yes --file requirements.txt |
6、克隆环境、重命名环境
1 | conda create --name B --clone A |
1 | conda create --name B --clone A |
7、删除环境
1 | conda remove --name B --all |
8、查看源
1 | conda config --show-sources |
本博客所有文章除特别声明外,均采用 CC BY-NC-SA 4.0 许可协议。转载请注明来自 花火の红玉宫!
 微信
微信 支付宝
支付宝
相关推荐


评论